Your first mod with REDcode
In this walkthrough you rename an item V owns. It is the smallest mod REDcode can make: one line of text, no other program, no code. On the way you use every step a bigger mod needs: a project, finding something in the game, changing it, packing, installing, looking in the game, and taking it out again.
| Time | About 15 minutes |
| Before you start | REDcode is installed and ready |
| In the game | ArchiveXL, a free framework that lets mods add and change texts, with RED4ext, which it needs. EDGEdeck’s frameworks page installs both |
| Optional | EDGEdeck. With it, your mod sits in the same list as your other mods. Without it, REDcode copies the mod into the game itself |
| On this page | |
|---|---|
| 1. Make a project | A folder for your mod |
| 2. Find the item’s name | In the LocKeys view |
| 3. Add it to your project | Your own copy of the text |
| 4. Change the text | And save |
| 5. Pack and install | One button |
| 6. Look in the game | The new name |
| 7. Take it out again | Uninstall |
| What just happened, What to try next |
The steps inside REDcode (1 to 5, and 7) were each tested by REDcode’s developer. The walkthrough as a whole, ending with the new name seen in the game, is not on record as one test: if a step doesn’t match what you see, please tell us on Discord.
1. Make a project
A project is a folder that holds everything your mod is made of. REDcode uses the same kind of project as WolvenKit.
- Click the REDcode icon in the activity bar, the strip of icons down the left edge of VS Code.
- In the Project view, press New Project.
- Type the name
my_first_modand press Enter. The name becomes the mod’s file name, so keep it short, in small letters, with no spaces. - Choose where the project’s folder goes: anywhere outside the game folder, for example a
Cyberpunk modsfolder in your Documents. Press Create project here.
VS Code opens the new folder. If it asks whether you trust the authors of the files in it, say yes: the folder is yours.
You should see the Project view showing my_first_mod with four folders under it: Archive, Raw, Resources and Packed, all empty.
2. Find the item’s name
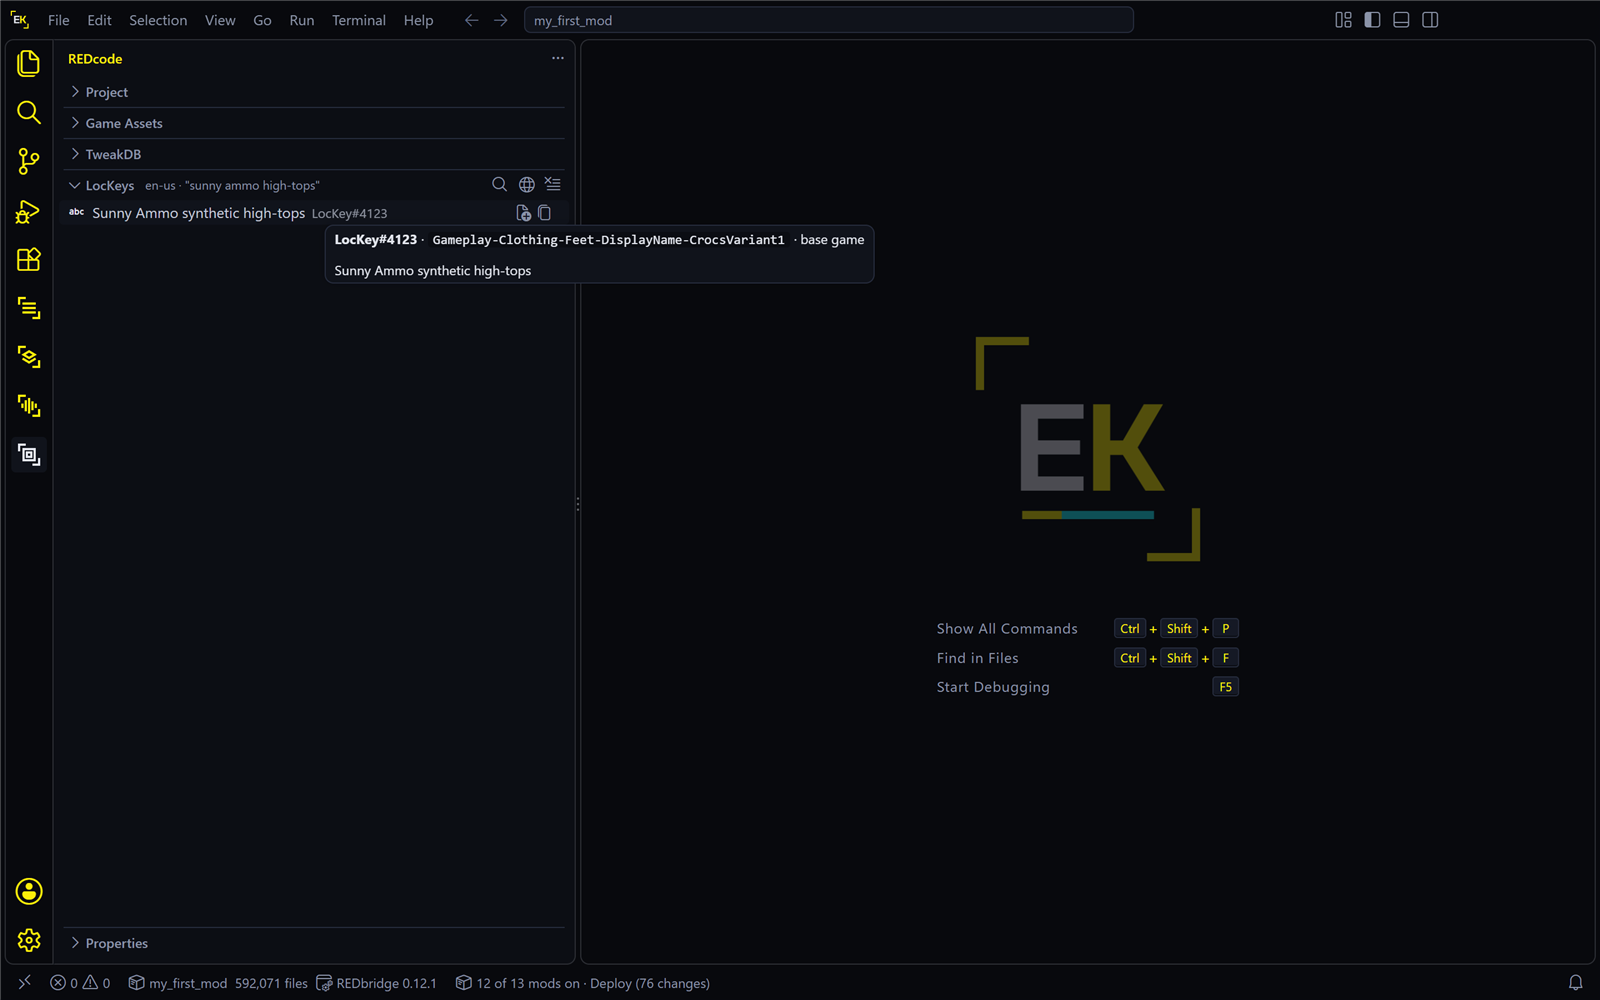
The game doesn’t keep an item’s name with the item. The name is a numbered text called a LocKey (such as LocKey#4123), and the item only refers to the number. The LocKeys view, lower down in the REDcode sidebar, finds texts by their words.
- Pick an item V owns and remember its name. This page uses the shoes “Sunny Ammo synthetic high-tops”; yours can be anything.
- In the LocKeys view’s title bar, press Search LocKeys… (the magnifier).
- Type a few words of the name, such as
sunny ammo high-tops, and press Enter.
You should see a short list of entries, each with its text and its LocKey number. The first search takes a second or two.
| If | Do this |
|---|---|
| The list is empty | Try fewer words. Every word you type must be in the text |
| You play in another language | Press LocKey Language… (the globe) in the view’s title bar, pick your language, and search again |
| There are several entries with the same text | The game sometimes has the same name more than once. Take the first; if the name doesn’t change in the game, come back and do the next one too |
3. Add it to your project
You can’t change the game’s own copy of the text. You add a copy to your project and change that.
Hover over the entry and press Add to Project Onscreens, the first button on its row. (“Onscreens” is the game’s word for its on-screen texts.)
You should see:
| Where | What |
|---|---|
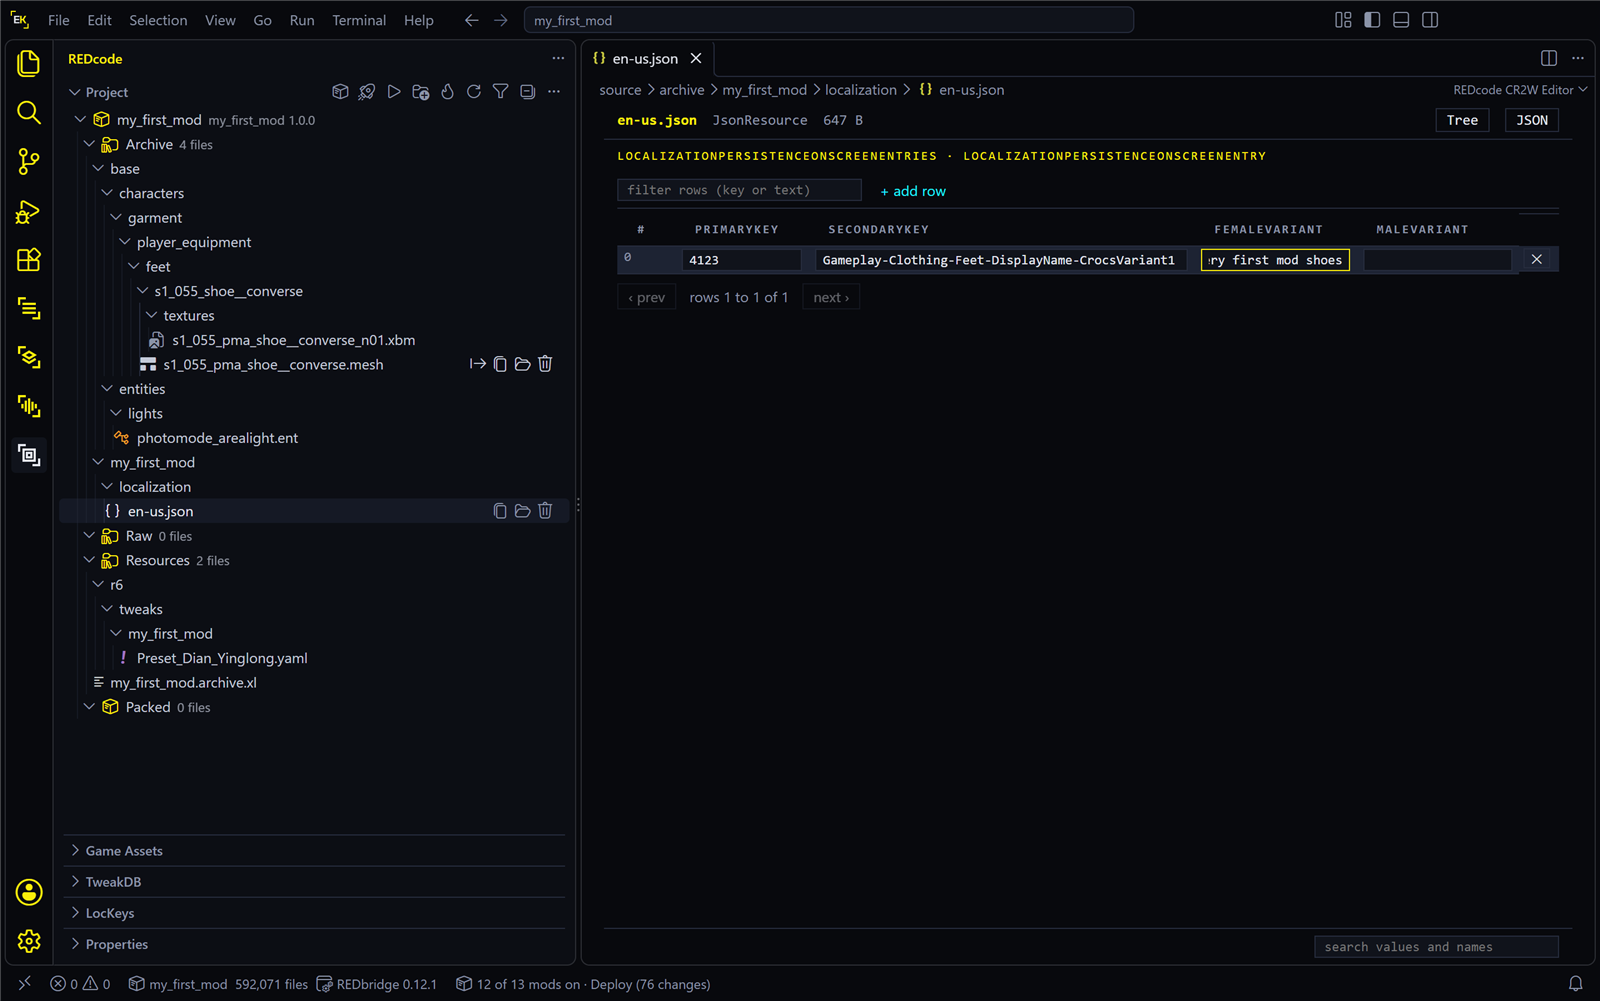
| The editor | A table with one row: your entry, with its key and its text |
| The Project view, under Archive | A new file, my_first_mod\localization\en-us.json (or your language), selected. This is your project’s own text file |
| The Project view, under Resources | A small file, my_first_mod.archive.xl. It tells ArchiveXL to load your text file. You don’t need to open it |
4. Change the text
- In the table, click the text in the femaleVariant column.
- Type the new name, for example
My very first mod shoes, and press Enter. - If the maleVariant column has a text of its own, change it too. Most entries leave it empty, and the game then uses the one text for everyone.
- Press
Ctrl+Sto save.
You should see the dot on the editor’s tab go away when the file is saved. Search again in the LocKeys view: your entry now shows your text, with a pencil icon that marks it as your project’s.
5. Pack and install
Pack builds the mod from your project. Install puts it in the game. One button does both.
Close the game if it is running. In the Project view’s title bar, press Pack and Install, the rocket.
You should see:
| Where | What |
|---|---|
| The Project view, under Packed | archive\pc\mod\my_first_mod.archive and my_first_mod.archive.xl beside it. That is the finished mod |
| With EDGEdeck | A mod called my_first_mod, version dev, in EDGEdeck’s Mods view, switched on and deployed |
| Without EDGEdeck | A line in the status bar saying how many files REDcode installed into the game |
If a warning mentions capital letters or spaces, the project’s name has some: see Troubleshooting.
6. Look in the game
- Press Run Game, the play button in the Project view’s title bar.
- Load a save and open the inventory.
- Find the item and hover over it.
You should see the new name.
| If | Do this |
|---|---|
| The old name still shows | Check that ArchiveXL is installed, and that the game was started after you installed the mod. Then check the language: your text file is for one language, the one chosen in the LocKeys view |
| The name changed in one place but not another | The game has a second entry with the same text. Do steps 2 to 5 for it as well |
| The game doesn’t start | Take the mod out (step 7) and see Troubleshooting |
7. Take it out again
Close the game. In the Project view’s title bar, open the ... menu and choose Uninstall.
You should see the mod switched off in EDGEdeck, or a status bar line saying how many files REDcode removed. Start the game again and the item has its old name.
Your project is still there. Pack and Install puts the mod back whenever you like.
What just happened
| Step | What it was | The same step in a bigger mod |
|---|---|---|
| Add to Project Onscreens | A copy of something from the game, in your project | Add to Project on a game file |
| Changing the text | An edit to your copy | The CR2W editor, an image editor, Blender, EDGEmat |
| Pack | Your project’s files built into an .archive, the kind of file the game loads mods from |
The same button |
| Install | The archive put in the game’s archive\pc\mod folder |
The same button |
| Uninstall | The game back as it was | The same menu item |
What to try next
| Try | You’ll use | Page |
|---|---|---|
| Change an item’s price | TweakDB, and a tweak file: a few lines of text | Try it: change a price |
| Change one value in a game file | The CR2W editor | Try it: change one value |
| Repaint a texture | Export, an image editor, Import | Try it: repaint a texture |
| Find the files behind an item | Game Assets, Find Items | Finding what you want to change |
| See changes without restarting the game | Pack and Play, with REDnode | Pack and Play |
| Let an assistant do the work | Claude Code with EDGEchat | Assistants and MCP |