The Desk
The Desk is where you try things before they go into a mod. Put a garment’s mesh on it (its 3D shape, a .mesh file), recolor its materials, look at it in 3D, make a second version beside it, and add the one you like to a project when you are ready. Nothing on the Desk touches your projects or the game until you say so, and the Desk keeps everything when you close VS Code.
It is the first view in EDGEmat’s sidebar, above Game Materials and Find. If your EDGEmat has a Library view and no Desk, it is an older version: update it in the Extensions view.
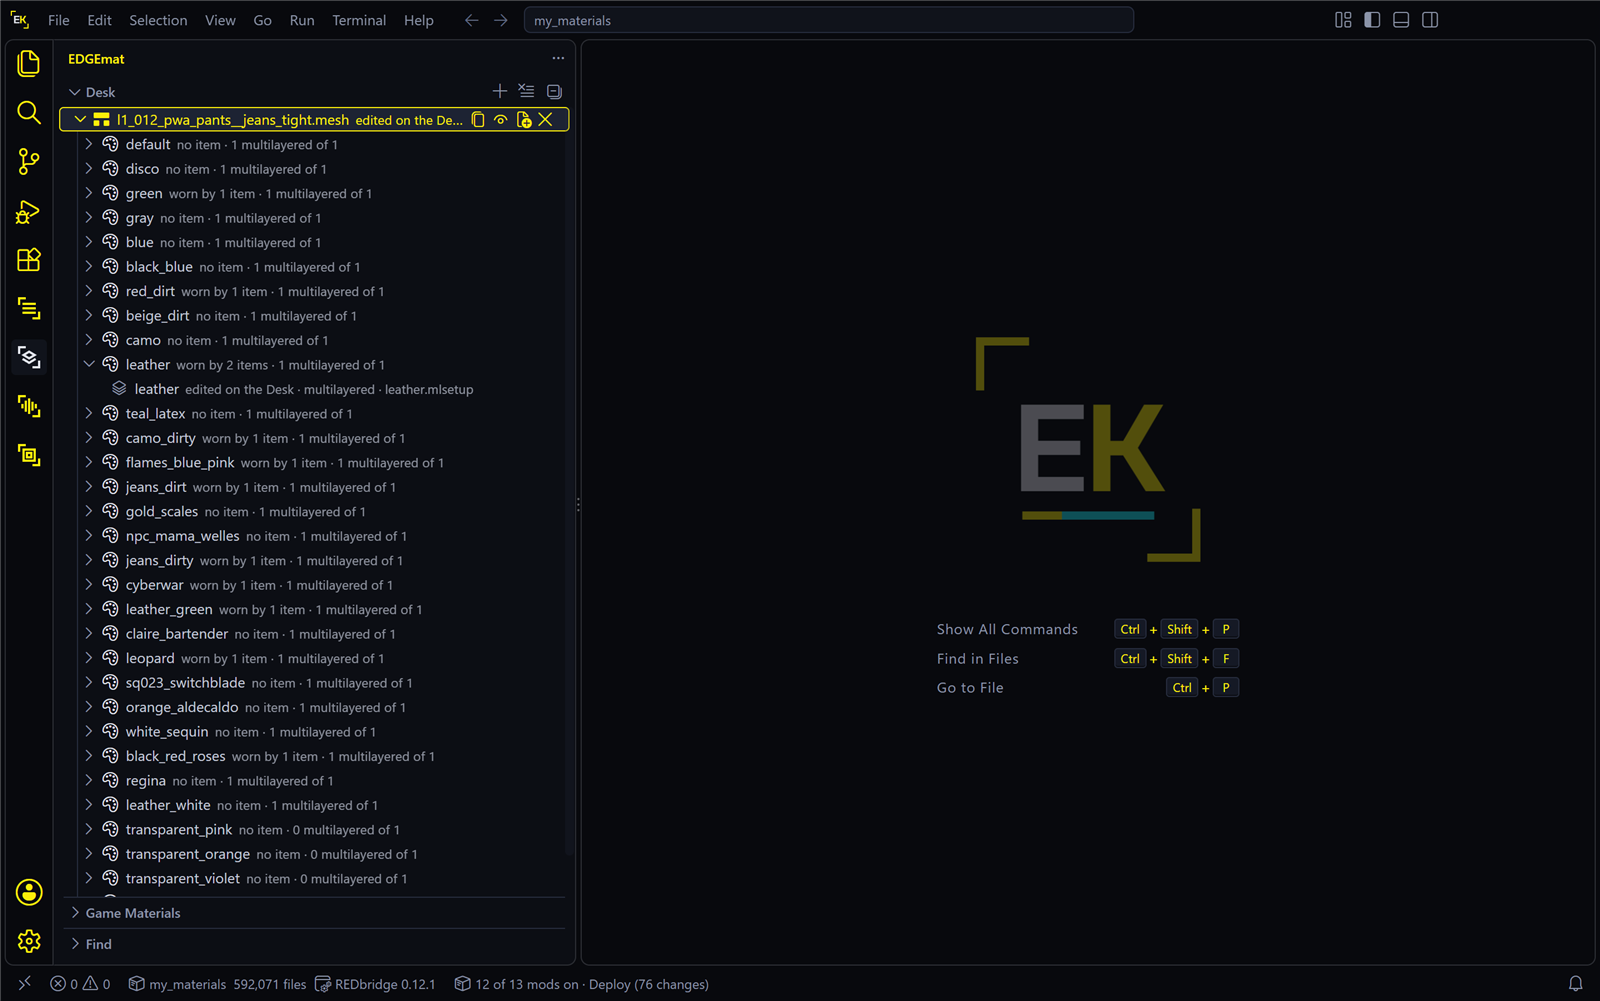
Each mesh or setup on the Desk is one line. A mesh line unfolds into its looks (the same shape in different materials; the game’s files call them appearances), and each look into its materials.
| On this page | |
|---|---|
| Desk, or straight from Find? | When to use it |
| Put something on the Desk | From Find, from REDcode, from your project |
| Edit on the Desk | Ctrl+S keeps the edit here |
| Try it: two colors, side by side | A ten-minute walkthrough |
| Variations | Several versions of one garment |
| Add to a project | One line or all of them, and both body types |
| A prop’s parts | A game surface, a game material or the model’s texture on each part of a prop |
| Take things off, Where it lives |
Desk, or straight from Find?
You don’t have to use the Desk. A setup you open from Find can be saved straight into a project with Save to Project. The short version:
| Use | When |
|---|---|
| Find, then Save to Project | You want one plain recolor in a project now. It usually covers both body types in one go |
| The Desk, then Add to Project | You want to try several versions, come back to it later, or the garment is one Save to Project can’t reach. Each Desk line changes one mesh, so one body type |
The full comparison is on the Find page: Two ways into a project.
Put something on the Desk
| From | Do |
|---|---|
| Find | Find a garment by its name, such as comfy rocker. Unfold it to its mesh, hover the mesh row and press + (Add to Desk) |
| REDcode’s Game Assets view | Right-click a .mesh › Open in EDGEmat. Game Assets knows file paths, not in-game names: use its funnel (Filter Game Assets) with part of the file name, such as l1_012_pwa |
| REDcode’s Project view, VS Code’s Explorer, or a mesh’s editor tab | Right-click a .mesh › Open in EDGEmat. A mesh from your project shows from <project> on its line |
| REDcode’s 3D view | Open in EDGEmat in its toolbar, on the mesh you are looking at. The look on screen opens |
A game .mlsetup in Game Assets |
Open in EDGEmat puts the setup itself on the Desk and opens it |
| What you should see | |
|---|---|
| On the Desk | The mesh as a new line, selected, with its looks under it. One look is unfolded: the one the most in-game items wear, or the one you found it under in Find |
| In the editor area | If that look has just one layered material, it opens in the setup editor straight away. If it has several, a message in the status bar (the strip at the bottom of VS Code) asks you to click the one you want |
| Beside each look | Who wears it: worn by 2 items, or no item |
Pick a look that an item wears. A look marked no item is worn only by NPCs, so V can’t put it on and you can’t check your change in the game. Hover a look for the names and ids of the items that wear it. If the look you wanted says no item, choose another look of the same mesh.
The first time, the “worn by” marks take about ten seconds to appear, while EDGEmat reads every clothing item in the game.
Edit on the Desk
- Under a look, click a layered material. It has a stacked-sheets icon and the grey text multilayered · …mlsetup.
- The setup editor opens. Under the title it says “on the Desk” and “Ctrl+S saves it on the Desk”.
- Change layers as usual (Changing a layer), then press
Ctrl+S.
EDGEmat does not ask where to save: the edit stays on the Desk. The line and the material now read edited on the Desk.
- View in 3D (the eye on a mesh line) shows the Desk’s edit. If you open the same mesh from Find or from REDcode’s Game Assets, you still see the game’s original colors.
- The edit lives on that Desk line only. Your projects and the game don’t change.
Try it: two colors, side by side
You need REDcode installed, for the 3D view. No project is needed until the last step.
- In Find, search
comfy rockerand unfold Comfy rocker aramid-weave slim-fits. - Under your V’s body, hover the mesh
l1_012_pwa_pants__jeans_tight.mesh(feminine;l1_012_pma_...on the masculine body) and press +. - The Desk shows the mesh with its look leather open, and the setup editor opens on leather’s layers. Click the biggest layer, pick another color, and press
Ctrl+S. - On the Desk, hover the mesh line and press the eye. In the 3D view, pick leather in the Appearance list.
- Back in Find, press + on the same mesh again.
- Recolor the new line differently: unfold its look leather, click its layered material, pick a color,
Ctrl+S. - Right-click the new line › Rename…, type
blueand press Enter.
| What you should see | |
|---|---|
| After step 3 | The line and its material read edited on the Desk |
| After step 4 | The pants in your new color, in REDcode’s 3D view |
| After step 5 | A second line, …, variation 2, with the game’s colors. The status bar says it is a fresh copy |
| After step 7 | Two lines, the second reading …, blue. The eye on each line shows its own color |
To wear one of them, go on to Add to a project. To throw both away, see Take things off.
Variations
A variation is a second copy of the same garment on the Desk, with its own edits. What happens when you put a mesh on the Desk again depends on the line that is already there:
| The line that is there | Putting the mesh on the Desk again |
|---|---|
| Has no edit yet | Just selects that line |
| Has an edit | Adds a fresh line, …, variation 2, with the game’s colors |
“Putting it on again” means the + in Find, or Open in EDGEmat in REDcode, as the first time.
Right-click a line › Rename… to give it a name, such as blue. The line then reads …, blue.
Add to a project
| Button | Adds |
|---|---|
| The new-file icon on a line (hover it), or right-click › Add to Project… | That line |
| The + in the Desk’s title bar (Add the Desk to Project…) | Every line. When one mesh is there twice, it asks which variation goes in: a mesh can wear only one in the game |
- Save your edits first with
Ctrl+S. EDGEmat warns you if a setup on that line still has unsaved changes. - Press the button. If REDcode has a project open, the line goes there. Otherwise you pick a project folder.
- A dialog says what will be written. Choose Add to Project, or Add and Take It Off the Desk (Add and Clear the Desk when you add everything).
| What you should see | |
|---|---|
| A message | “Added … to <project>: 2 files written”, with a Pack and Play button |
| In REDcode’s Project view | Your setup under a new name, ending in your project’s name, and the mesh |
What was written: each edited setup is saved as a new setup, and the mesh on that line is copied into the project and changed to use it. So the change shows in the game without any helper mod. A mesh the project already has is kept, and only changed to use the new setup.
Both body types. A Desk line is one mesh, and most garments have one mesh for the feminine body and another for the masculine. Adding one line recolors one body type only. To cover both, put both meshes on the Desk, make the same change on each, and add both. Or use the other route: Two ways into a project.
Two special cases:
- The project isn’t open in REDcode. EDGEmat opens it afterwards, so you can see what went in. If this window has no folder open, the window reloads on the project. That is normal, and the Desk stays as it is. If this window already has a folder open, the project opens in a new window. REDcode’s Project view then comes forward, with the same message and Pack and Play.
- The project already has its own copy of the mesh, with other materials. For example, you put a new material on the same look earlier. EDGEmat asks first. Replace with the Desk’s puts the Desk’s mesh in, with your Desk edits, and what the project’s copy had is lost. Keep the Project’s leaves the project as it is, and the line stays on the Desk with its edits.
Then pack and install: Your mod in the game. The In the game section of the setup editor, and right-click › Copy REDnode Command on a look, give you the command that puts the right item on V.
A prop’s parts
A prop is often made of parts, each with its own material: a vending machine’s front, its body, its glass. A prop that EDGEfab, EDGE’s asset maker, made from a 3D model has one material per part, all wearing the model’s own texture. On the Desk you can give any part a surface or a material from the game instead, or give it the model’s texture back.
This works on a mesh in your mod project, an EDGEfab prop or any other. Put it on the Desk from the project: in REDcode’s Project view, right-click the .mesh › Open in EDGEmat. Under its look, each part is one row, saying what it wears:
| The row shows | The part wears |
|---|---|
| A picture icon and the model’s own texture | The texture its model came with |
| A layers icon and multilayered · <part>.mlsetup | A game surface in one of its colors, put on with Use a Game Surface… |
The name of a material file, such as z_emissive_blue.mi |
A game material, or one made with New Material |
Right-click a part’s row for these commands. Hovering the row also shows two icons at its right: colors for Use a Game Surface… and the sparkle for New Material Here….
| Command | Does |
|---|---|
| Use a Game Surface… | Pick one of the game’s surfaces, such as car paint or concrete, then one of its colors. EDGEmat writes a setup with that one layer for the part. The setup editor opens it like any other, so you can change its color or tiling later |
| Use a Game Material… | Pick one of the game’s materials that suit any shape: glass, glows, tiling metals and woods. Or choose A game path… at the top of the list and type the path of any other .mi, such as one from REDcode’s Game Assets |
| New Material Here… | A material of your own, from words or a photo: New Material |
| Back to the Model’s Texture | Only on a prop EDGEfab made. The part wears its model’s texture again |
These change the project’s own mesh straight away, not a Desk copy. Pack the project to see them in the game.
Try it: car paint on one part
You need a project with a prop in it, open in REDcode.
- In REDcode’s Project view, right-click the prop’s
.mesh› Open in EDGEmat. The Desk shows the mesh with its look unfolded: one row per part. - Hover a part’s row and click the colors icon at its right (Use a Game Surface…).
- A list of the game’s surfaces opens at the top of the window. Type
car paintand choose car paint metallic 01. - The list of its colors opens. Type
redand choose red. - Press Open Setup in the message, or click the part’s row.
- On the look row, above the parts, click the eye (View in 3D).
| What you should see | |
|---|---|
| After step 4 | A message: “… now wears car paint metallic 01, red. Tiling …” with an Open Setup button. The row now has the layers icon and reads multilayered · …mlsetup |
| After step 5 | The setup editor with one layer: car paint metallic 01, red. Change it and press Ctrl+S: it saves in the project |
| After step 6 | REDcode’s 3D view with that part in red. The 3D view shows color, not shine, so car paint looks flat there. The game shows it glossy |
Then pack and install the project (Your mod in the game), and place the prop in the game, for example with EDGEbuilder.
Good to know
- Tiling. EDGEmat sets a surface’s tiling from the part’s size, about one repeat a metre, and the message says the number. On a vending machine’s front car paint came out at the right size in the game. If the grain looks far too big or too small, change Tiling in the setup editor.
- The first Use a Game Material reads your game’s materials once, about ten seconds, with a notification. After that the list opens at once. Its title says how many suit any shape, a few hundred.
- A material that may not fit. Decals, and layered materials painted for one particular mesh, are left out of the list. A path you type that may not fit gives a warning, such as “blood_b.mi may not suit this part: made for another kind of mesh or effect (decal.remt). Use it anyway?” Cancel changes nothing.
- Parts follow the model. How the parts were split is the model’s. On the test vending machine, the shelves of drinks belonged to the front, so they took the car paint too.
Take things off
| Button | Does |
|---|---|
| The × on a line (hover it) | Takes that line off. A line with edits asks first, because its edits are deleted |
| Clear the Desk… in the title bar | Takes everything off, edits included, after asking |
Your projects keep what you added to them. If a setup tab or 3D view still has one of the Desk’s files open, Windows may hold that file for a moment. The Desk is empty all the same, a note says so, and EDGEmat deletes the file when it next starts.
Where it lives
In %LOCALAPPDATA%\EDGEmat\desk, on your PC only, with one folder per line.
Deleting
%LOCALAPPDATA%\EDGEmatdeletes the Desk, with every edit you have not added to a project. The rest of that folder is safe to delete: see Where EDGEmat keeps things.
EDGEmat’s Desk is its own. Other EDGE tools that have a Desk keep theirs separately. The shared store for work you keep for good is the EDGE Library.
Ask an assistant instead
An assistant connected to EDGEmat can use the Desk too: “put the slim-fits on EDGEmat’s Desk, then list the Desk”. The tool is mat_desk. For a prop’s parts, ask “which parts does my vending machine have, and what does each wear?” or “put red car paint on its front”: the tools are mat_parts, mat_materials and mat_apply. They need EDGEmat’s own server, not the older one that comes with EDGEchat. See Assistants.