Edit and mix
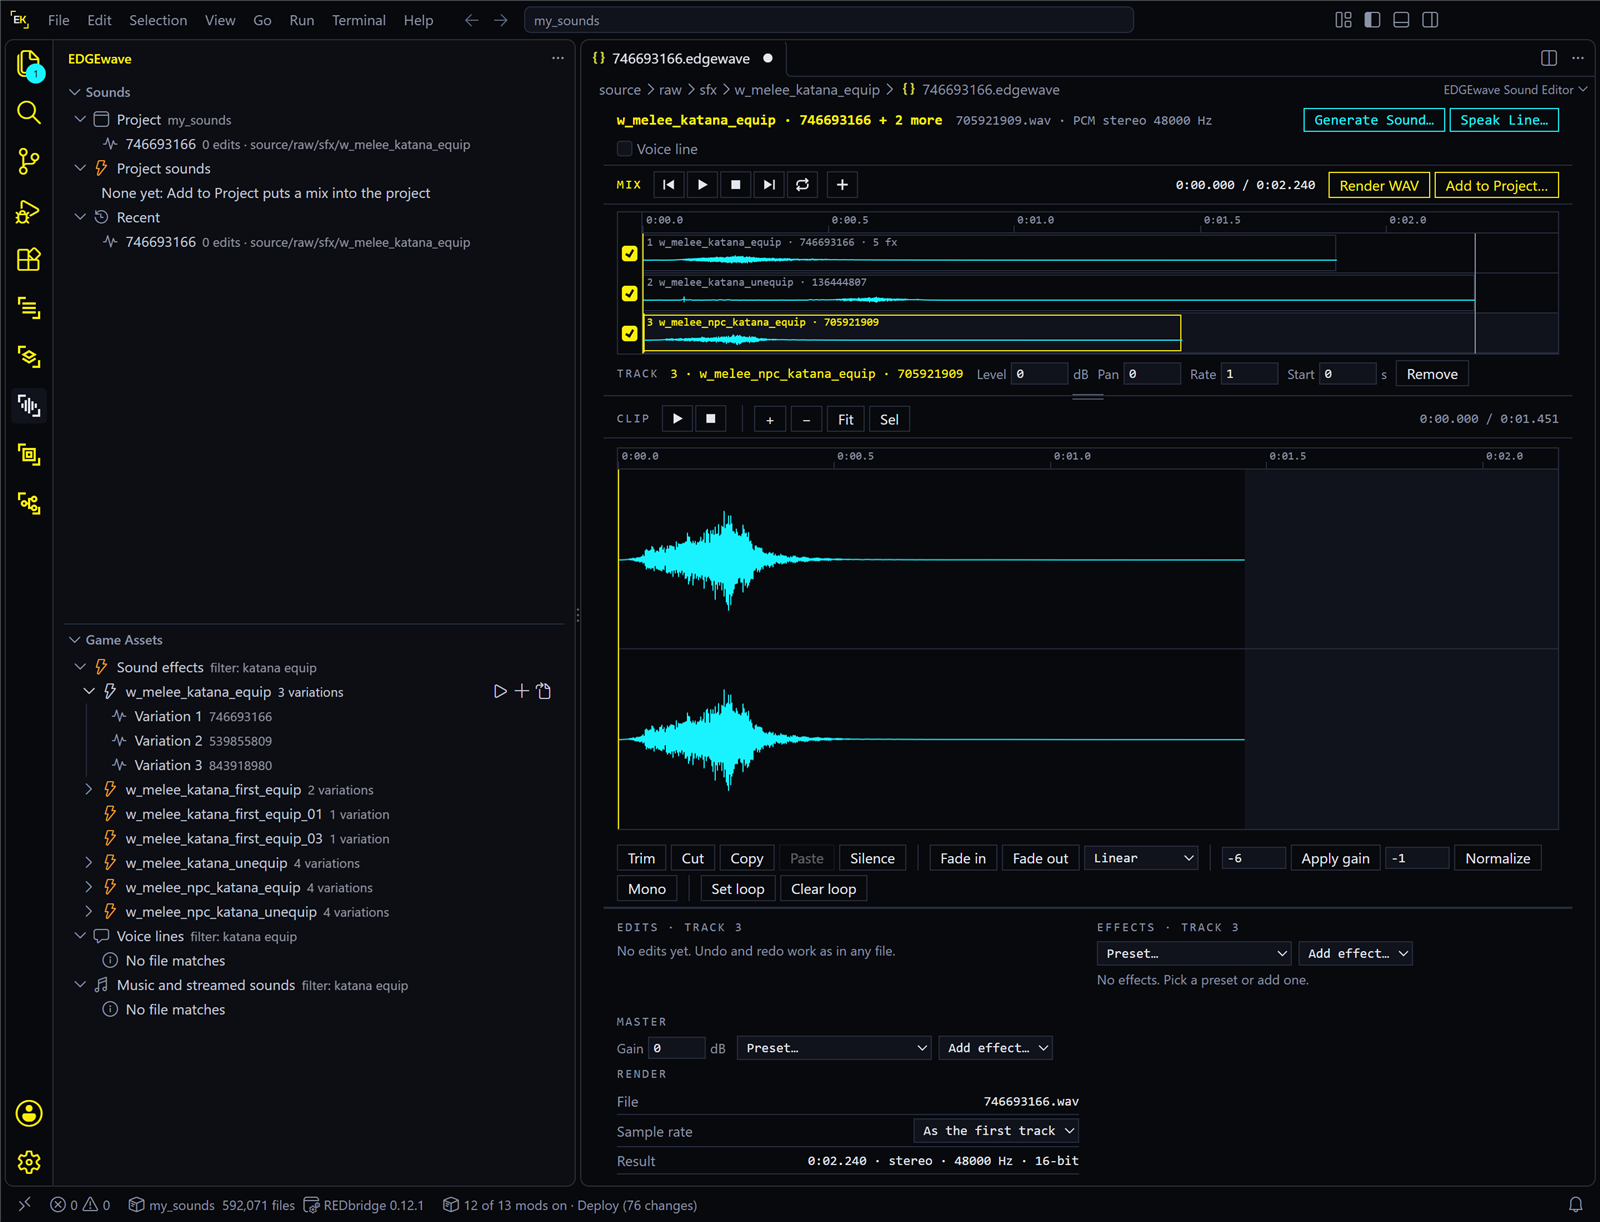
EDGEwave’s editor opens whenever you open a sound (Find and play sounds). One window does two jobs: it edits a single sound, and it mixes several sounds into one. Every sound document is a mix, even when it has just one track.
Nothing you do here changes the game’s sound or your own sound files. Each change is a step in the sound document, and every step can be undone or removed later.
| On this page | |
|---|---|
| The window | Its parts, top to bottom |
| Listen and select | Play, loop, zoom |
| The edits | Trim, Cut, fades, volume and the rest, in plain words |
| Undo, the Edits list and saving | |
| Tracks | Add sounds, place them, choose what is in the mix |
| Effects and presets | Radio, Holocall, PA speaker, Muffled through a wall |
| Try it: a line through a radio | Two tracks and a preset |
| Render a WAV | When you need a sound file |
| Keys |
The window
| Part | What is there |
|---|---|
| Header | The sound’s name and format. On the right, the voice tools Generate Sound… and Speak Line… (Voice tools), and the Voice line tick box |
| Mix bar | Buttons for the whole mix: jump to the previous clip edge, play, stop, jump to the next clip edge, loop, and + (Add Sound). On the right, the mix’s length, Render WAV and Add to Project… |
| Lanes | One row per track, on a shared timeline. Each lane has a tick box at its left: ticked, the track is in the mix |
| Track bar | The selected track’s name and its Level, Pan, Rate and Start, and Remove |
| Clip bar | Play and stop for the selected track alone, the zoom buttons, and the time at the cursor |
| Waveform | The selected track’s sound, the clip. You select and edit here |
| Edit buttons | Trim, Cut, Copy, Paste, Silence, the fades, Apply gain, Normalize, Mono or Stereo, Set loop |
| Panes | Edits (the steps you made on this track), Effects (this track’s effects) and Master (effects on the whole mix, and the Render settings) |
Click a lane to select its track. The Track bar, the waveform, the Edits pane and the Effects pane then show that track.
A thin bar sits between the Track bar and the Clip bar. Drag it to give the lanes or the waveform more room, or double-click it to fit every track.
Listen and select
| To | Do this |
|---|---|
| Play or stop the selected clip | Space, or the play button in the Clip bar. You hear the clip with its own effects |
| Play or stop the whole mix | Shift+Space, or the play button in the Mix bar. It starts at the mix cursor: click an empty part of a lane, or the ruler above the lanes, to place it |
| Select part of the clip | Drag on the waveform. Play then plays the selection. Ctrl+A selects all |
| Repeat | Press the loop button, then play: the selection or the whole clip repeats |
| Zoom | Ctrl and the mouse wheel, or + and −. Fit shows the whole clip, Sel zooms to the selection. The wheel alone scrolls |
If a key does nothing, click the waveform first. While the cursor is in a number box, the keys type in that box.
The edits
Each edit acts on the selection. Where it makes sense, with no selection it acts on the whole clip.
| Edit | What it does | Use it when |
|---|---|---|
| Trim | Keeps the selection and throws away the rest | The sound has dead air before or after it |
| Cut | Takes the selection out, closes the gap, and keeps the piece for Paste | A click or a breath in the middle has to go |
| Copy, Paste | Copy keeps the selection. Paste inserts it at the cursor | You want a part twice, or moved |
| Silence | Inserts quiet at the cursor, as long as the selection, or half a second | You need a pause |
| Fade in, Fade out | Raises the volume from nothing, or lowers it to nothing, over the selection. With no selection: from the start to the cursor, or from the cursor to the end. The menu beside them picks the fade’s curve: Linear, Exponential or Smooth. Try each and listen | A sound starts or ends too abruptly |
| Apply gain | Makes the clip louder or quieter by the number of decibels (dB) in the box beside it. Negative is quieter: -6 dB is half as strong | One part is too loud |
| Normalize | Raises or lowers the clip so its loudest moment reaches the level in the box (-1 by default, just under the maximum) | A sound is too quiet overall, or your edits made it quieter than the original |
| Mono / Stereo | Mixes a stereo sound down to one channel, or makes a mono sound stereo | The sound you replace has a different channel count and you want to match it |
| Set loop, Clear loop | Marks the selection as the mix’s loop points, or removes them. With loop points set, the Mix bar’s loop repeats that stretch | You are checking that a sound repeats cleanly. Loop points only steer listening in the editor |
Right-click the waveform for the same edits as a menu. Your selection is kept.
Apply gain is not the track’s Level. Apply gain is an edit: it changes the clip, shows in the Edits list, and can cover just a selection. Level, in the Track bar, sets how loud the whole track is in the mix.
Undo, the Edits list and saving
Ctrl+Zundoes andCtrl+Yredoes, as in any VS Code file.- The Edits pane lists every edit on the selected track, in order. Press the × beside one to remove just that edit, even if you made others after it.
- A dot on the tab means unsaved changes.
Ctrl+Ssaves the sound document. - If VS Code reloads while a sound has unsaved changes, EDGEwave puts them back and tells you. They are still unsaved until you save.
Tracks
A mix starts the moment a sound has a second track. There are three ways to add one.
| Way | How |
|---|---|
| Add Sound | Press + in the Mix bar. Type part of an event’s name or tag, such as door, pick the event, then pick a variation. The list also has A sound file… and A game file by its path… (for a voice line: paste its path, copied in Game Assets with Copy Name) |
| From Game Assets | Press + on a sound’s row there. It lands on the sound whose editor you used last |
| Drop files | Drag sound files from the desktop or from VS Code’s Explorer onto the lanes, holding Shift as you drop. Each becomes a track. Dropped on the waveform instead, the first file replaces the selected track’s sound: its edits are cleared, its level and effects are kept |
Without Shift, VS Code opens a dropped file in a tab of its own, and EDGEwave never sees it. Files from the desktop are copied into a <name>.sounds folder beside the sound document. Files from the Explorer are used where they are.
| What you should see | |
|---|---|
| A new track | One more lane at the bottom, selected, named by its number and its sound: 2 · <event> · <hash> for a sound effect, 2 · <file name> for a file |
Place and shape a track
| To | Do this |
|---|---|
| Move a sound in time | Drag its clip sideways along the lane, or type seconds into Start |
| Change the order of the lanes | Drag a lane up or down, or right-click it and choose Move Up or Move Down |
| Make a track louder or quieter | Level, in dB |
| Move it left or right | Pan: -1 is left, 0 is the centre, 1 is right |
| Make it faster and higher, or slower and lower | Rate: 1 is normal, 2 is twice as fast and an octave up, 0.5 is half speed. Pitch and speed change together; pitch alone is not there yet |
| Take a track out | Remove. Ctrl+Z brings it back |
In the mix, or not
The tick box at the left of each lane decides whether the track is in the mix. Unticked lanes are dimmed and silent. Right-click a lane for Only This Track, which unticks every other, and All Tracks.
The mix of the ticked tracks is what you hear with Shift+Space, what Render WAV writes and what Add to Project puts into the game. An unticked game sound still has a job: it names a sound your mix can replace. See What goes in, and what it replaces.
Effects and presets
An effect changes how a sound sounds without changing its length or content. Effects sit in a chain: the sound passes through them top to bottom. Each track has its own chain, in the Effects pane, and the Master pane has one for the whole mix.
The quick way is a preset, a ready-made chain. Open Preset… in the Effects or the Master pane and pick one.
| Preset | Sounds like | Made of |
|---|---|---|
| Radio | A small, cheap speaker: thin and a little crunchy | High-pass, low-pass, EQ, distortion, compressor |
| Holocall | A phone call: narrow, slightly rough, with a hint of room | High-pass, low-pass, EQ, light distortion, short reverb |
| PA speaker | An announcement in a hall or a station: harsh, with a long echo | High-pass, low-pass, distortion, a 1.4 second reverb |
| Muffled through a wall | Next door: dull, the highs gone | Low-pass, EQ, short reverb |
A preset replaces the chain it is applied to. After that every value is yours to change, and each effect has a tick box to switch it off for a moment and an × to remove it.
To build a chain yourself, add effects one at a time from Add effect…:
| Effect | What it does | Its values |
|---|---|---|
| EQ | Turns the low, middle and high parts of the sound up or down, like the bass and treble knobs on a stereo | Low, Mid, High, in dB |
| Low-pass | Lets the low part through and removes the highs: muffled, far away, behind a door | Freq: where the cut starts, in Hz. Lower is duller. Q: how sharp the edge is |
| High-pass | Lets the high part through and removes the lows: thin, tinny, a small speaker | Freq, Q |
| Band-pass | Keeps only a band in the middle: a telephone | Freq: the middle of the band. Q: higher is narrower |
| Reverb | Adds the echo of a room | Decay: how long the echo lasts, in seconds. Mix: how much echo against the dry sound, 0 to 1 |
| Distortion | Adds grit, like an overdriven speaker | Amount, 0 to 1 |
| Compressor | Evens out the volume: the loud parts come down, so the quiet parts seem louder | Threshold: the level above which it acts, in dB. Ratio: how hard it presses |
A reverb’s echo rings on after the sound ends. EDGEwave keeps that tail when it plays and when it renders.
Try it: a line through a radio
- Open a game sound effect, for example the katana sound from the tutorial.
- In Game Assets, filter for
judy q307, unfold Voice lines and press + on one of Judy’s lines. - Click the new lane. In the Effects pane, choose Preset…, then Radio.
- Drag the line’s clip a little to the right, so it starts after the first sound.
- Press
Shift+Space.
| What you should see | |
|---|---|
| After step 2 | A second lane with the line. The header’s Voice line box is ticked while it is selected |
| After step 3 | Five effects in the Effects pane |
| After step 5 | The first sound plays clean, then Judy’s line comes through a radio |
Untick the first lane and press Shift+Space again: now only the line plays.
Render a WAV
Render WAV, in the Mix bar, writes the mix of the ticked tracks as one 16-bit WAV file, reverb tails included.
You don’t need it to get a sound into the game: Add to Project renders by itself, in the format the game wants. Render when you want the file, to play it in another program, to send it to someone, or to drop it into another mix.
| Where it goes | Beside the sound document, with the same name: <name>.wav. For a .wav you opened from disk it is <name>.edit.wav, so your original is kept. The Render rows in the Master pane show the file |
| Sample rate | How finely the sound is stored. Leave it on As the first track unless another program asks for a rate |
| What you should see | A message “Rendered <file>.”, and the result in the Render rows. Rendering also saves the sound document |
Keys
| Key | Does |
|---|---|
Space |
Play or stop the selected clip |
Shift+Space |
Play or stop the whole mix |
Ctrl+X, Delete, Backspace |
Cut the selection |
Ctrl+C, Ctrl+V |
Copy the selection, paste at the cursor |
Ctrl+A |
Select the whole clip |
Home, End |
Cursor to the start, to the end |
Ctrl + mouse wheel |
Zoom the waveform |
Ctrl+Z, Ctrl+Y |
Undo, redo |
Ctrl+S |
Save the sound document |
| Up and down arrows, on the bar between the Track bar and the Clip bar | One lane more or less room. Press Tab until the bar is selected |