Your first quest
In this walkthrough you make a small quest and play it. The quest sends V home to the apartment in Megabuilding H10. At the door V thinks aloud, and the player picks one of three options. Each option ends the quest in its own way. You write no code and open no game file.
| Time | About 30 minutes |
| Before you start | EDGEquest is installed, and its Try it worked |
| In the game | ArchiveXL and RED4ext, two free framework mods. See What you need |
| A test save | A save in which V can walk to the apartment in Megabuilding H10. Make it now, before you install the quest, and keep it. Step 8 says why |
| On this page | |
|---|---|
| 1. Make a project | A folder for your mod |
| 2. Start the quest | New Quest, and what the template holds |
| 3. Change a line and an objective | Click and type |
| 4. Add an option with its own ending | A third way out |
| 5. Write the description | One line of text |
| 6. Save, and catch a mistake | Saving makes the quest |
| 7. Pack and install | One button in REDcode |
| 8. Play it | What you should see in the game |
| 9. Change it and play again | The loop from now on |
| Change the place | Optional, and untested |
| What was tested, What to try next |
1. Make a project
A project is a folder that holds everything your mod is made of. REDcode makes it. It is the same kind of project WolvenKit uses.
- Click the REDcode icon in the activity bar, the strip of icons down the left edge of VS Code.
- In the Project view, press New Project.
- Type the name
my_first_questand press Enter. - Choose where the project’s folder goes: anywhere outside the game folder. Press Create project here.
You should see the Project view showing my_first_quest with empty folders under it. Your first mod with REDcode shows this step with more detail.
Use a new project for this. A project that already holds another test quest gives you two quests at the same door: see Two quests play their scenes at the same place.
2. Start the quest
- Click the EDGEquest icon in the activity bar.
- At the top of the Project Quests view, press New Quest (the +). The command palette has it too, as EDGEquest: New Quest….
- The title: type
Something at the Doorand press Enter. This is the name the journal shows. - The id: EDGEquest suggests one made from the title. Replace it with
door_mysteryand press Enter. The id is short, in small letters, with_between words. - The first time only, EDGEquest asks for your modder name, also in small letters. It remembers it.
Choose the id with care. It becomes part of the quest’s file names and of everything the quest remembers in a save. Changing it later makes a different quest.
You should see:
| Where | What |
|---|---|
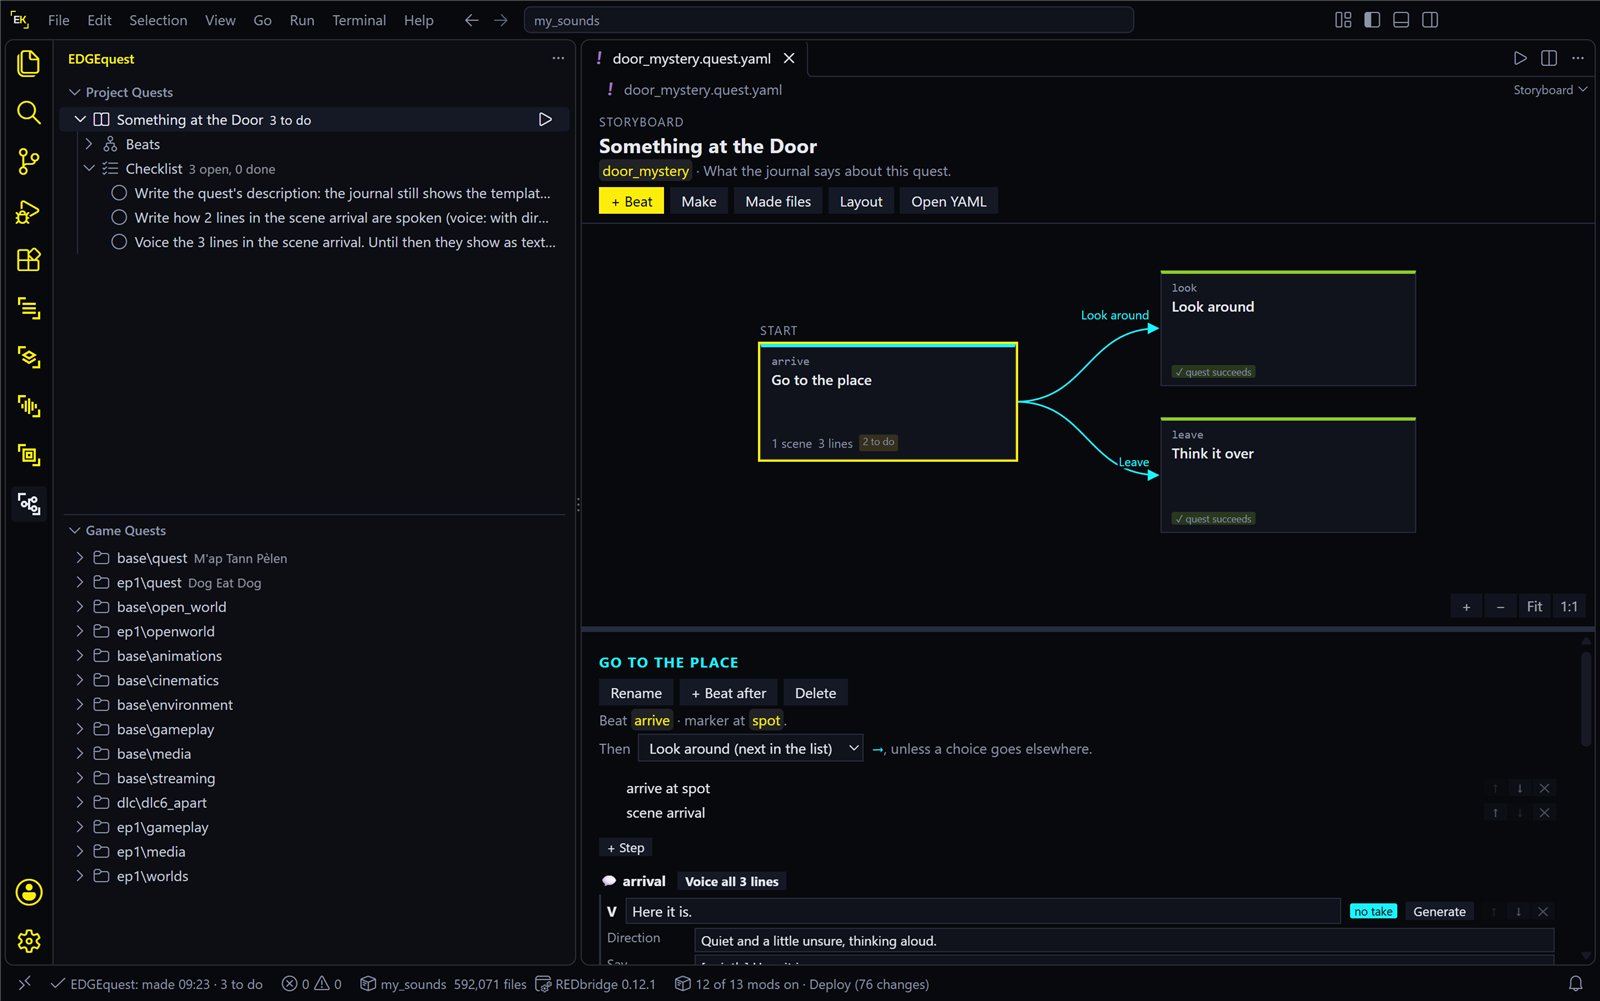
| The editor | The Storyboard: three cards joined by arrows. One card says “Go to the place”. Arrows labelled Look around and Leave lead from it to the cards “Look around” and “Think it over”, and both of those are marked quest succeeds |
| A message | “Something at the Door starts from the template: a place, a scene with a choice and two endings. Its game files are being made” |
| The status bar, bottom left | After a few seconds: EDGEquest: made, a time, and how many things are left to do |
| The Project view | A new file at the top of the project, door_mystery.quest.yaml. This is the story file: your quest in words, and the only file you change |
| Project Quests | Your quest, with its beats and its checklist under it |
Each card is a beat: one stage of the quest, titled with the objective the journal shows while it runs. The template has three:
| Beat | What happens in it |
|---|---|
| Go to the place | The journal says “Go to the place”, with a map marker on V’s apartment door. When V gets there, a scene plays: V says “Here it is.” and the player picks Look around or Leave |
| Look around | Three seconds pass, then the quest ends as succeeded |
| Think it over | Three seconds pass, then the quest ends as succeeded. This is where Leave goes |
3. Change a line and an objective
- Click the card Go to the place. Its page opens under the board.
- Press Rename at the top of the page. Type
Go to your apartmentand press Enter. This changes the objective the journal shows. - Further down is the scene, named
arrival. Its first row is V’s line, in a box that saysHere it is.Click in the box, typeHome. Something feels different.and press Enter.
You should see the card’s title change to “Go to your apartment”, and a dot on the editor’s tab. The dot means the story file has changes that aren’t saved yet. You save in step 6.
Under the line are two smaller boxes, Direction and Say. They describe how the line should be spoken, for voicing it later. Leave them for now. Voice prompts explains them.
4. Add an option with its own ending
The choice has two options. You add a third, and a new beat for it to lead to.
-
At the top of the Storyboard, press + Beat. Type the objective
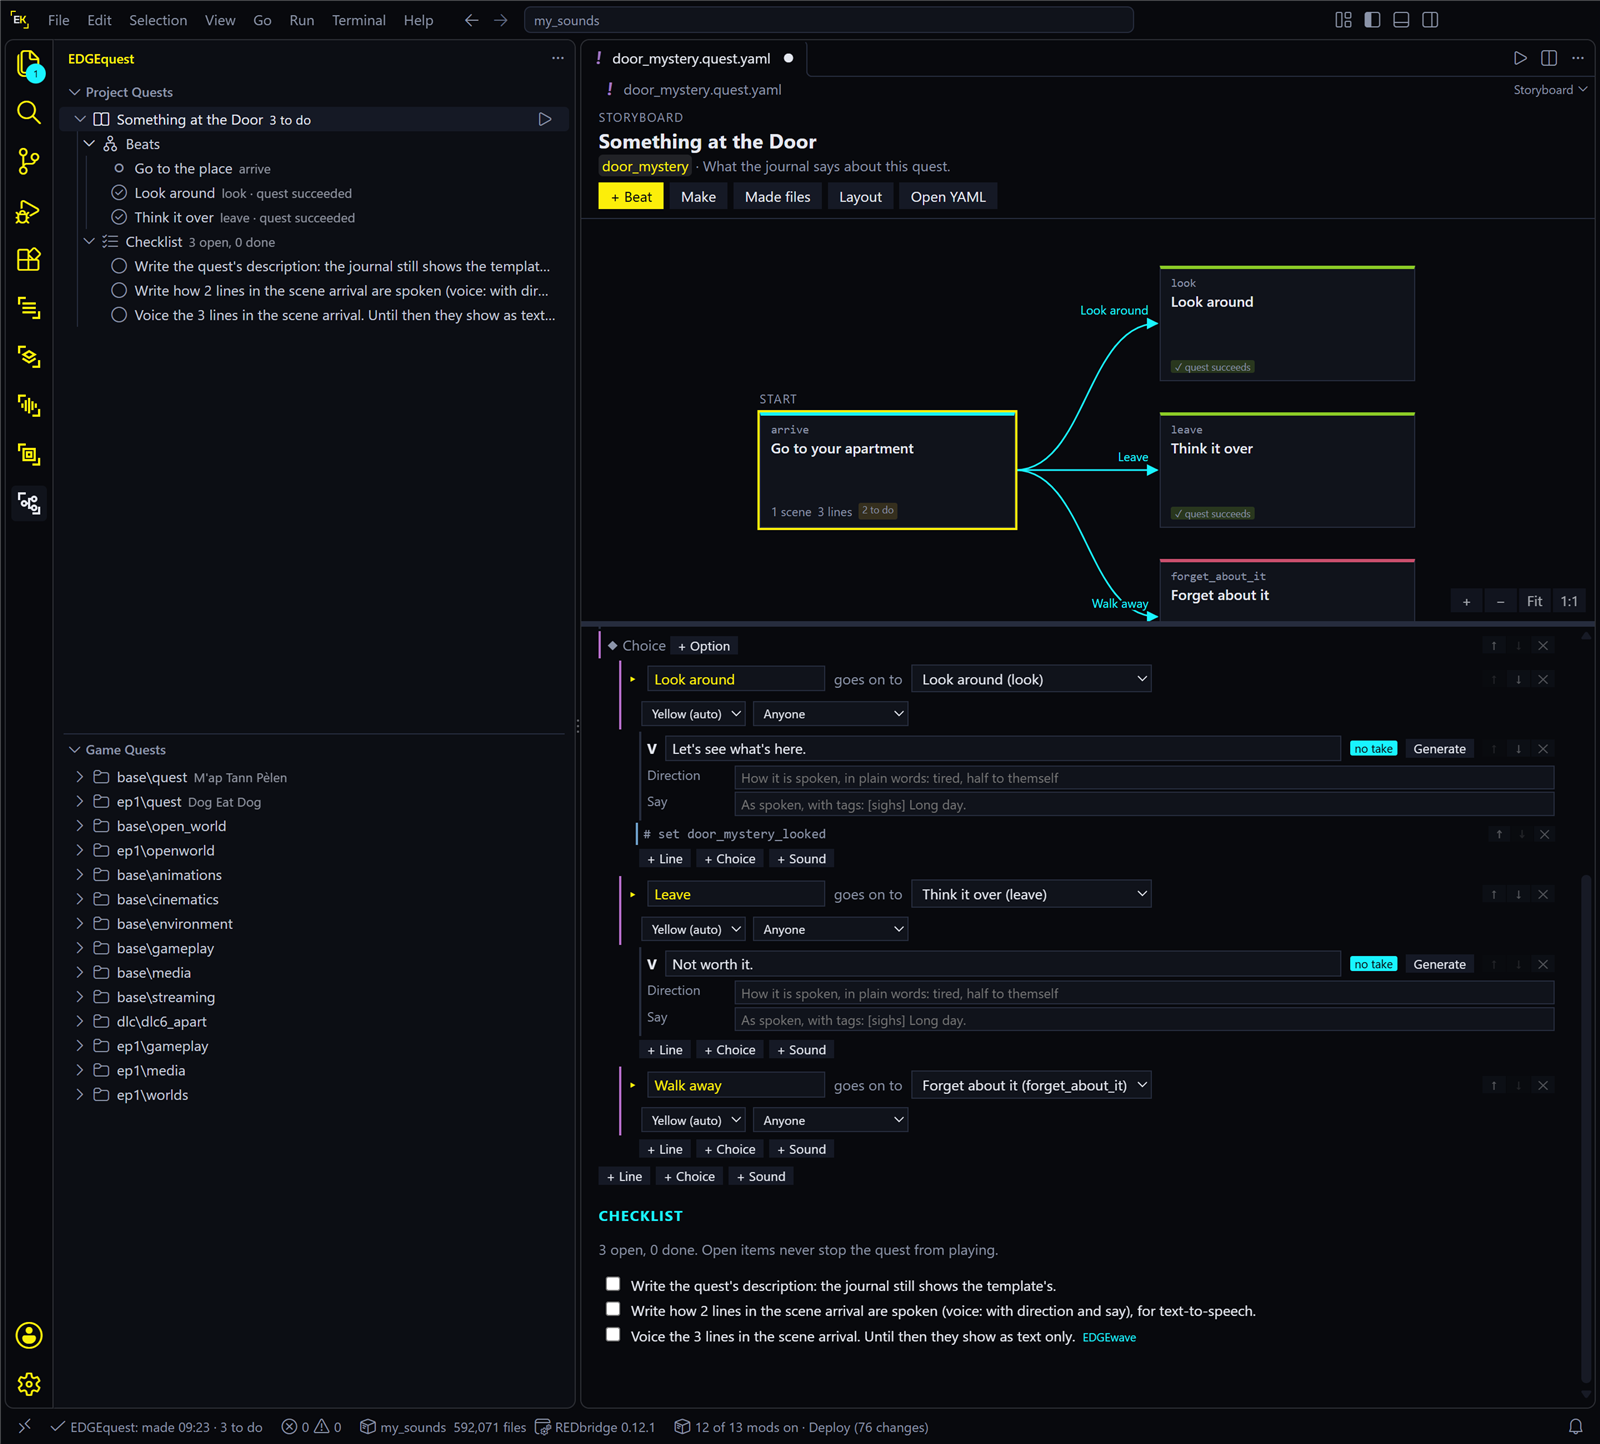
Forget about itand press Enter.You should see a fourth card. No arrow leads to it: nothing in the quest goes there yet, so the quest still plays as before.
-
Click the new card. On its page, find the line that starts with Then, and pick the quest fails from its list.
You should see the card marked quest fails. It is now an ending.
- Click the card Go to your apartment again. In the scene, on the row Choice, press + Option. Type
Walk awayand press Enter. - On the new option’s row, find goes on to and pick Forget about it from its list.
You should see a third arrow on the board, labelled Walk away, from the first card to “Forget about it”. On the page the option is now marked yellow. EDGEquest colours an option yellow when it leads to another beat, which is how the game marks options that move the story on.
To give the option a line of its own, press + Line in the row under it, type Not today. and press Enter. V says it after the player picks the option.
5. Write the description
The journal shows a short description under the quest’s title. The template’s is a placeholder, and the Storyboard has no box for it, so you change it in the text.
- At the top of the Storyboard, press Open YAML. The story file opens as text beside the board. YAML is a plain text format:
key: valuelines, with indentation showing what belongs inside what. - Near the top, find the line
description: What the journal says about this quest. - Change it to
description: Go home and see what is different.
Look through the rest of the file while it is open. Everything you did on the Storyboard is there in words: your beats under beats:, and the line and the three options under scenes:. The board and the text are two views of the same file. The story file explains every part.
6. Save, and catch a mistake
Saving makes the quest. Each time you save the story file, EDGEquest writes the quest’s game files into your project and checks them. A change on the Storyboard is not saved until you save.
- Press
Ctrl+S.
You should see the dot leave the tab, and the status bar say EDGEquest: made with the time. Click it to list the game files that were made. You don’t need to open them.
Now break something on purpose, to see what a problem looks like.
- In the YAML text, find the line
- go: lookunder the option Look around. Change it to- go: lokand save.
You should see:
| Where | What |
|---|---|
| The status bar | EDGEquest: 1 problem, not made, on a warning colour |
| VS Code’s Problems panel (click the status bar) | go: "lok" is not one of the beats, followed by your beats’ names, at its line in the story file |
| The Storyboard | The cards are replaced by a notice with the same problem and a link to its line |
- Change
lokback tolookand save. The board comes back and the status bar says made again.
A quest with a problem is not made, so the game files stay as they were at the last good save. Fix problems before you pack.
7. Pack and install
The quest is in your project. The game doesn’t have it yet.
- Quit the game if it is running.
- In the activity bar, click the REDcode icon. In the Project view’s title bar, press Pack and Install (the rocket).
REDcode packs the project into a mod and puts it in the game. With EDGEdeck installed, the mod goes into EDGEdeck’s list and is deployed from there. See Pack, install and run.
You should see a message from REDcode that the mod was packed and installed.
REDcode’s Pack and Play (the flame) is no shortcut here. It swaps files into the running game, but a quest is added by ArchiveXL when the game starts. Use Pack and Install, then start the game.
8. Play it
- Press Run Game (the play triangle) in REDcode’s Project view, or start the game your usual way.
- Load your test save: the one you made before you installed the quest.
- Open the journal. Something at the Door is listed, with your description and the objective Go to your apartment. Track it.
- Follow the marker to V’s apartment in Megabuilding H10 and walk in through the door.
You should see:
| When | What |
|---|---|
| The save has loaded and you track the quest | The objective on the HUD, a map marker at V’s apartment door, and a route to it |
| V steps inside the apartment | The subtitle “Home. Something feels different.”, then three options: Look around, Leave and Walk away |
| You pick Look around | The line “Let’s see what’s here.”, the objective changes to Look around, and after three seconds the quest is completed |
| You pick Walk away instead | Your line, the objective Forget about it, and the quest fails |
There are no voices: in this preview, lines show as subtitles.
To see another ending, load the test save again. Why the test save matters: a new quest starts once in each save, the first time that save loads with the mod installed. Saves you make afterwards remember how far the quest got. Your test save, made before the first install, always starts it from the beginning.
| If | Do this |
|---|---|
| The quest isn’t in the journal | See The quest doesn’t show in the journal |
| V is at the marker and nothing happens | Walk right in. V arrives by stepping into an invisible area inside the apartment, not by being near the marker. See V reaches the place and nothing happens |
9. Change it and play again
The loop from now on:
- Quit the game.
- Change the quest on the Storyboard, and save.
- Pack and Install.
- Start the game and load the test save.
To take the quest out of the game, use REDcode’s Uninstall. To remove it for good, see Removing a quest.
Change the place
Untested. Only V’s apartment door has been tried in the game. Other places are made the same way, but nobody has seen one work yet. For a first quest, keep the door. If you try another place, please tell us on Discord what happened.
A place is a map marker the game already has, written as a path. The Storyboard has no picker for places yet, so you copy the path from a game quest and paste it into the text.
- Find a game quest that sends V where you want, and open its page. Copying a place from a game quest shows where the marker’s path is and how to copy it.
-
On your Storyboard, press Open YAML and find the
places:block near the top:places: spot: marker: quests/minor_quest/mq055_romance_apartment/01_megabuilding/judy_megabuilding/apartment # V's apartment door; any game map marker works area: "#mq000_tr_vs_apartment" # V arrives inside this; leave it out to use the marker's own - Replace the path after
marker:with the one you copied. - Delete the whole
area:line. It names the invisible area inside V’s apartment. Without the line, EDGEquest uses the area the game’s own quest uses with your new marker. - Save.
| The Problems panel says | It means |
|---|---|
| Nothing | EDGEquest found the marker and an area for it. Pack, install and try it |
| The place “is not a game map marker the quest index knows” | The path isn’t a marker EDGEquest can use. Check that you copied all of it, or pick another |
| The place “has no trigger area to arrive in” | The game’s quests don’t wait for V near that marker, so EDGEquest has no area to use. Pick another marker. See Places |
What was tested
EDGEquest’s developer tested the parts of this walkthrough, but not the walkthrough as one run. From EDGEquest’s test record:
| Part | Seen working |
|---|---|
New Quest, the Storyboard, edits, saving, a deliberate bad go: in the Problems panel |
Yes, in VS Code |
| A quest made from the template, played from the marker to its end | Yes, in the game |
| A choice that leads to different endings, one succeeded and one failed | Yes, in the game |
| A choice with more than two options | Yes, in the game |
| This exact quest, with these edits | Not on record |
| A place other than V’s apartment door | No |
| Whether an early save, from before V has the apartment, can reach the door | Not on record |
If a step doesn’t match what you see, please tell us on Discord.
What to try next
- Give an option a condition, such as a Body check or a price: Kinds of options.
- Start music when V arrives, and stop it in every ending: Music and sound.
- Read how the game stages a conversation you remember: Reading the game’s quests.
- Ask Claude to write the next quest: For assistants.